How to Know When to Change the Soil in your Pots
Warning! This is a long article. Take it slowly and try to absorb the process. If you have any questions, please email me right away!
- Before we start, let me make one clarification. We don’t use soil or dirt in pots. There are specialty mixes created just for our pots, planters and even raised beds, and this is most often called potting mix. However, most people search for information on what kind of soil to use in pots. For ease of writing this article, I will use the word soil, and you will know I am referring to potting mix.
Back to the question -“How do I know it is time to change the soil in my pots?”
I have mixed feelings when I answer this question because I’m afraid I might disappoint people. As is so often when asked gardening questions, my answer begins with, “It depends.”
It happens so often that I will chuckle when I know what I am going to say. I think to myself, “Here I go again!”
Let’s Get Back to Changing Soil in Pots
The main differentiator of how often to change the soil in your containers is the size of the pot. First, let’s talk about the three reasons you need to replace the soil.
1. The reason you need to replace potting mix in containers is that the roots of the plants take more room in the pot than there is soil to support them. As they get humongous and overgrown, they keep pushing the dirt out and deplete the nutrients and access to moisture.
We call this becoming root-bound. Root-bound plants do not grow as well or as fast as plants in containers with plenty of room to stretch out. You won’t necessarily notice the abundant roots are restricting the plant’s growth. But you may see the plant rising out of the soil. The roots are pushing on the bottom of the pot and lifting themselves up and out.
Additionally, the water flows immediately upon watering out of the drainage hole.
All the water in the world is not enough
2. The second reason you need to change the soil in your pots is that they will no longer take on water. Root-bound plants are the first cause of wilting, as noted above.
However, sometimes the rapid drainage of water is caused by the soil drying out too many times between watering. Or it has completely dried out.
Homeowners often do not think about the soil in their pots when they leave on vacation or for the summer. We believe as long as we remove the plants, the job is complete. However, the soil, left to the desert’s intense sun, does not get enough water and will dry out completely, making it unsalvageable.
Another situation where the soil dries out is when they are on an irrigation system, and someone turns off the valves because it has rained or you are gone for some time. The line to the pot might have been broken by a critter or even a landscaper. Dogs and critters can do this in the blink of an eye. One day all is well, and the next, there is an errant line that goes unnoticed.
The soil is old
3. Good potting mix is rich in feel and smell. Old potting soil can take on the appearance of untended landscape dirt. Instead of being deep brown, the color takes on a gray appearance. It does not absorb moisture, and when you dig in it, it often comes out in dry cakes and typically is full of dead roots.

The natural nutrients of potting soil have depleted, and fertilizer may not help because there are not enough supportive materials remaining in the soil.
There is no hard-fast rule of how long soil remains viable. The same as my answer to the general question begins with “It depends,” determining if the soil is old depends on its age and the care it has received. I would put a life cycle of 2.5 to 3 years in 20″ -26″ pots, if I had to say.
Defining Potting Mix
There is no “soil or dirt” in potting mixes. You might think you can use your garden soil or landscape soil in your pots, but I do not recommend general garden soils, no matter how much money you save.
One of the most important reasons you want to use a commercial potting mix is because it has been sterilized, killing off any weeds and plant-borne diseases and will provide your tender plants with a safe environment to thrive.
Big box stores and local nurseries bring in various mixes appropriate to container gardening. They might be called a potting mix, potting soil, all-purpose potting mix, or organic potting mix.
Potted plants and gardens need a particular mix of materials that retain moisture and nutrients while allowing air circulation and ample drainage. Garden soil is too heavy for containers.
Common ingredients used in potting soil are sphagnum peat moss, perlite, pumice and composted materials such as earthworm castings, mushroom composts and natural nutrients.
The potting mix comes in small bags, hardly big enough for a couple of small houseplants up to two cubic feet bags. These massive bags of potting soil can weigh 40 pounds, so be sure you know how much you can handle. If you are doing a lot of large pots, you can have bagged potting soil delivered to have an easier time managing it. I found placing it up on a sturdy shelf, at least waist-high, gave me the leverage to move it into a wheelbarrow.
How to know when your soil needs to be changed

Wilting Plants
- The plant does not recover from wilt even though the soil is damp.
- When you water the pot, the water runs right through the soil and drains out.
- Water does not appear to soak in when you try watering the soil. It either pools on top or runs straight through.
- The soil looks like cakes of dry material when you try to dig it out.
- You check the pot in the afternoon, and the plant is wilted (especially in the summer heat.) You water the soil deeply, and when you check it in the morning, the plant is still wilted.
Sad Plants
- The plant is losing leaves even though the soil is moist.
- The leaves are curled and remain so after watering.
- The plant does not perk up even with fertilizer.
- Tips of the leaves are brown, and there is little new growth.
Signals from the pot itself
- Roots are growing out of the drainage hole(s).
- The pot is tipping because the plant is top-heavy.
- There are salt and mineral buildup on the pot and possibly on the top of the soil too.
- The pot breaks. 🙁
These scenarios suggest that the plants are root-bound and need to be repotted when the season is suitable for uprooting survival.
>>Repot in the late spring when the danger of a freeze has passed.
How to change the soil in your outside pots
I’m not going to cover small pots and houseplants in this article except to mention the standard rules:
Standard Repotting Instructions
- For pots 14″ or smaller, use a pot one size larger to repot your houseplants and small tropicals or succulents.
- Gently remove the plant and clean the roots of old soil.
- Use a coffee filter or screen to cover the container’s drainage holes.
- Add fresh potting mix to your pot. Press down to remove air pockets as you fill.
- Sprinkle in some time-release fertilizer and mix it around the top third of the soil.
- Place the plant snuggly into the potting mix and add more to fill the pot up to 1.5 – 2 inches from the top.
- Make sure you don’t bury the stem deeper than in the original pot.
- Water the plant well. If the soil compresses more, add more planting mix to the height mentioned above.
How Big are Your Pots?
Replacing Potting Mix in Pots Up to 26″

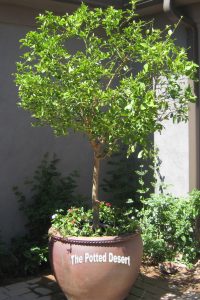
Lay the pot carefully on its side to remove large plants and soil. I have managed heavy glazed ceramic pots up to 26″ on my own.
Years ago, I was fearful of losing my first Mexican Lime tree. It was in a 24″ ceramic pot, and in the late spring of that year, it was wilting severely. I watered it until I knew the entire soil volume was wet. Then I waited. The leaves were curled and drying out, and there was no difference that day. The following morning after the pot irrigation also watered the pot, I went out to check it, and it had not recovered. See the picture below before the wilt threatened my tree.
Even though it was late in the spring season and Tucson temperatures were warming up fast, after talking with fellow Master Gardeners, I decided to risk repotting the tree. I wasn’t sure it would otherwise make it through the summer. The method I describe below is how I did it, and as the song goes, “All by myself.”

Changing the Soil in 18″ – 26″ Planted Containers
These steps will work with 18″ to about 26″ pots. Larger than this, it would be impossible to empty the planter completely, and it is not necessary. See below for directions for your super-sized pots.
- Plan to work with the planted container when it can be in the shade.
- On the day before you repot, give the plant a good soaking.
- The next day, start by placing a tarp on the side of the pot you plan to work.
- Remove the top layer of dirt.
- Tip the pot towards the tarp with a firm grip, and using your legs, bring it slowly down to rest on its side. A helper would be nice to have for this step.
- Remove all loose soil.
- Dig around the pot edges, loosening the plant.
- Keep working until you can gently ease the plant out of the pot. Don’t worry about hurting the roots. We can cut one-third of the roots without harming the plant.
- Slide the plant out onto the tarp.
- If the plant(s) in this pot are (and have been) healthy, you can clean out the pot and give it a good wash with a brush.
- Discard the old soil by putting it in your compost pile or add to a desert area. If any of the plants were unhealthy (besides the lack of water), throw the soil out. Do not add it to your compost as there may be diseased organisms.
Inspect the Roots
Remember, we are replanting this pot because the plant has not gotten enough water. The roots have probably grown so large; they take up most of the room, displacing the soil. We will not upsize the pot, so we need to reduce the root volume.
Check to see if the roots are growing in a continuous circular cluster at the base of the soil. If so, loosen the roots, working to straighten them out and then cut them back by 1/3.
If the roots are not circling but are a heavy mass, thin them out again by cutting through the mass and removing up to 1/3. Pruning the roots will encourage new growth.
Re-pot the plant using the Standard Repotting Instructions listed above
Here is a good YouTube video by Garden Bite that will give you some extra tips. Start watching at 2 minutes into the video.
>DO NOT TRIM THE PLANT’S CANOPY AT THE SAME TIME YOU TRIM THE ROOTS<<
Enhancing the Soil in Jumbo Planted Containers
Pots larger than 24-26″, too cumbersome to entirely replace the soil, still need your attention. When the tree or shrub in this sizable pot is struggling, make sure it is getting enough water and that you are following my recommended fertilizing schedule. If it still is wilting, the chances are that the plant is root-bound or the soil is too old to nourish the plant.
These pots will respond to amending the existing soil. We rarely want to empty the entire container, and you usually do not need to do this.
Follow these steps to refurbish your soil and help the plant regain its health. Repotting is best done during the gentler seasons in the desert. Spring after the last freeze or early fall, after the constant blast of summer heat, but before the nights cool off and temperatures dip to the 50s.
- Remove the outer layer of soil, especially around the edge of the pot. Try to take six inches or more of soil out without tearing many of the surface or “hair” roots.
- As you remove the bulk of the top 6″ of soil, dig down around the root ball with your trowel and see if you can loosen (or remove) any additional volume of soil.
- Add time-release fertilizer, mixing it around the root ball. Do not allow a large amount of fertilizer to remain in one area or clump as it could burn the roots. You can estimate a “grandmother’s handful for every 18” of soil surface.
- Water the remaining soil thoroughly.
- Work fresh potting soil down into the holes and pockets you made and mix it with the old soil.
- Fill the pot with additional potting mix to the original soil level on the plant’s trunk.
- Water the pot again, ensuring the entire soil area is saturated and water comes out of the drainage holes.
When This Does Not Work
There are times when the plant needs to have its roots pruned to continue its growth. Root pruning is often necessary for citrus trees and Myrtle shrubs. You have a couple of options in handling this situation.
Transplant the tree or shrub into the ground. You will never keep up with a fast-growing tree, and the only option is to plant it in the ground.
Trim the roots. Slower growing plants can be root-pruned while you are removing some soil. I have cut one side of the roots with pruners or a small saw (usually the front side) of the shrub and removed up to one/third while it is still in the pot. Then I have room to mix new soil and some new annuals to add color to the combination.
The pot is only 18″ wide in the picture below, and we could have followed my directions for smaller pots. I can’t remember why we chose to cut the roots, but we did, and the plant did fabulously!

Your Plant May React to this Treatment
Don’t be surprised if your plant reacts to being repotted. They may drop leaves or wilt. Be sure to keep them consistently hydrated and keep your eye on them. Once you see new growth, you know they are recovering. Plants like Ficus trees are very particular about being moved or tousled around this way. They will most likely drop all their leaves. Get it back in its permanent location and be kind to it.
As noted above, citrus trees may react, while shrubs will take the treatment along in stride.
And, FYI, Bougainvilleas do not like their roots disturbed, so I do not recommend repotting them. I don’t think Bougies belong in pots at all. They need room to stretch their roots.
Additionally, since they will likely die back in the middle desert’s winter, they are not anything to look at, and I want our pots to be blooming 365 days a year. However, I know some of my gardening friends have terrific luck with Bougies in pots. If you are determined or live in a frost-free climate, go for it! I never say never.. well, almost never!
After Care
Keep your newly potted plant consistently well-watered. Don’t add more fertilizer until you see new growth on the end of the branches or along the trunk. Then you can restart your bi-weekly water-soluble fertilizer applications. If the canopy also needs to be trimmed, only remove deadwood this season, and wait until the next cool season to give it a good haircut.

Now, pay attention —
If you repotted the plant in the spring, wait until early fall to trim the canopy.
- Any later, you risk pushing it into new growth, which is susceptible to early freeze damage. Any earlier, and it can burn in the summer sun.
- Plants repotted in the fall need all their foliage to protect against the winter cold.
- Therefore, waiting to trim the canopy until early spring gives them the best chance of recovery and health.
Summary:
A wilting large plant, shrub or tree that does not respond to a deep watering may be root-bound. Take action in early spring in the desert to rectify the situation.